Pentax K2 Review
INTRODUCTION:
The Pentax K2 was a professional grade electromechanical 35mm SLR introduced in 1975. Released with the mid-level Pentax KX and entry-level KM, these were the first generation of bodies to use the new K-mounting system for the new line of Pentax K-mount SMC lenses. The K-mount was designed to replace the aging M42 screw mount found on all the older Spotmatic bodies which allowed the photographer to change lenses with a quarter turn.
Although K-Series camera bodies were only around for 3 years, they were still historically significant because they were a key step in Pentax’s strategy to modernize the lens mount in order to compete with other camera companies during the golden age the 1970s.
BRIEF HISTORY:
The sales of Pentax cameras had been on a steady decline since the mid-late 1960s. Even though Pentax cameras were technically on par with other cameras on the market at the time, it was held back by the old M42 screw mount system. This pain point would become more apparent and introduce more challenges for Pentax when the Olympus OM-1 camera was first released in 1971. Not only did the Olympus OM-1 have a faster lens mounting system, it also redefined camera portability which made the Spotmatic feel like a brick. From then on, consumers wanted more compact cameras on the market and Pentax didn’t have an immediate contender. Even other camera giants like Nikon, Minolta and Canon were caught off guard by the Olympus OM-1 in the early 1970s! Compact cameras such as the Nikon FM, Minolta XD and the Canon AE-1, wouldn't make their appearances in the market until 1976.
Although Pentax wanted to shift to building compact cameras too, they were aware that the antiquated M42 was holding them back. Pentax didn’t seem to completely realize that the K-mount - which they developed in collaboration with Zeiss-Ikon in 1969 - would actually be the key to their success but didn’t take immediate action. This was a critical mistake and could have significantly mitigated the declining sales.
In 1973 Pentax sales were now down by 40% - the lowest it has ever been. Pentax decided to put the K-mount into action, but needed to find the most effective way to make that happen.
The solution was to use the existing Spotmatic body, make some minor refinements, and swap out the M42 lens mount for the new K-mount. Unfortunately it meant that lenses with the M42 mount were no longer compatible with the new Pentax k-mount bodies.
As an overall company decision, this was a simple but smart move to address the biggest pain point first without worrying about body size and design interface updates. There simply wasn’t enough time.
By 1975, the Pentax KM, Pentax KX and Pentax K2 would take the centre stage along with a new lines of K-mount SMC lenses. Although these three camera bodies didn’t sell that well, it did turn some consumer's heads and would buy the company just the right amount of time to finish and release their new line of compact M-series cameras in 1976. The professional Pentax MX and entry-level Pentax ME (see FIGURE 1).

FIGURE 1: A limited version of the compact 1976 Pentax ME SE. Limited versions were made in a brown finish instead of the traditional black. Unfortunately my copy has a dented flash hot shoe and broken film advance mechanisms. This camera will be going into the shop for repair soon.
In 1976, Pentax wasn’t done with K-Series and would release two more bodies: the upgraded professional grade Pentax K2dmd and the camera most people know, the entry level Pentax K1000. The Pentax K1000 was a stripped down version of the KM without the depth of field preview button, mirror lock up switch and self timer lever, but its simplicity made it a fan favourite.
The Pentax K2dmd was basically the K2, but with an added aperture window on the pentaprism and motor drive couplings located at the bottom of the camera for continuous 2FPs shooting. The Pentax K2dmd was also the most expensive camera at the time and is still expensive today because of limited quantities. The K2dmd is also very hard to find in good working condition in today’s market.
Out of all the great K-series cameras, the Pentax K1000 become the most popular camera and even reaching media culture status! The Pentax K1000 would also live to be second longest manufactured camera in Pentax’s history and all other K-series models were forgotten. Although the Pentax K1000 was in production until about 1997 with millions of units produced, many export versions were made outside of Japan throughout the later years. The exported versions were made with plastic top and bottom plates instead of metal and also lacked the ‘Asahi Opt. Co’ logo embroidered on the body. While these downgraded features were somewhat minor, it did slightly de-value the K1000’s glorious beginnings.
If Pentax utilized the K-mount system on the ES and ESII before the Olympus OM-1 came out, they would’ve been much closer in the race in terms of lens mount tech and prevent sales from dropping dramatically. Maybe they would’ve even released the compact Pentax MX and ME closer to when the Olympus OM-1 came out.
Despite the major setbacks, Pentax still managed to pull through and positively conclude the 1970s with the successful M-Series cameras. By 1980 the professional Pentax LX would be released, which easily rivalled the introduction of the professional Nikon F3 and Canon New F1 systems at the time. That’s a whole other story I will save for later.
Not only did Pentax show the competition their persistence to make it back to the top in the late 70s and early 80s, their Pentax LX would also live on to be the longest produced and most well respect professional manual focus 35mm SLR camera in history. The Nikon F3 was discontinued in 2000 while the Pentax LX stretched a year longer, retiring in 2001.
Let’s have a look at what the Pentax K2 has to offer:

USER EXPERIENCE:

I don’t know any other camera system that is more simple to use than the Pentax K2. Compared to some of the other 35mm SLR cameras in my collection, it’s a camera with no “distracting gimmicks” - as long as you have a solid understanding of the exposure triangle, this a very simple camera to use. Even someone who has less experience can quickly get the hang of the Automatic mode (see FIGURE 6). You select the aperture on the ring and the black needle inside the viewfinder will indicate the shutter speed the camera will fire at. The fast SPD light meter technology is also quick and snappy making aperture priority a dream when fast shooting decisions need to be made. I like to use Automatic mode when I am taking quick single portraits or group shots of people at events.
The only feature I could call a “gimmick” on the Pentax K2 is the placement of the ISO and exposure compensation dials, located around the collar of the lens mount (see FIGURES 2, 3 and 4). Adjusting the exposure compensation dial isn’t that bad, it’s changing the ISO that’s unintuitive.

FIGURE 2: The ASA (ISO) dial discreetly placed around the collar of the lens mount.
The problem I have with adjusting the ISO is that it requires both hands and some finger dexterity to turn the wheel to the desired ISO setting. Not only do you have to depress a button down in order to turn the ISO dial, you also need a bit of a sharp finger nail to poke into the rivets that will allow you to turn the ISO dial. I found simply grabbing the dial with your fingers doesn’t provide enough grip. You also have to have the Exposure Compensation switch set to “1X” in order to make any ISO adjustments, otherwise the dial will remain locked when set to any other exposure value.

FIGURE 3: The large button that needs to be held down while the ISO dial is rotated. The rivets are placed below for turning the dial.
Remembering to have the exposure compensation set to “1X” is inconvenient. I didn’t figure this out on my own without consulting the manual. I really thought my ISO dial was busted. Thankfully you only need to set the ISO once before you start shooting a fresh roll of film, but this simple camera function is way over engineered.

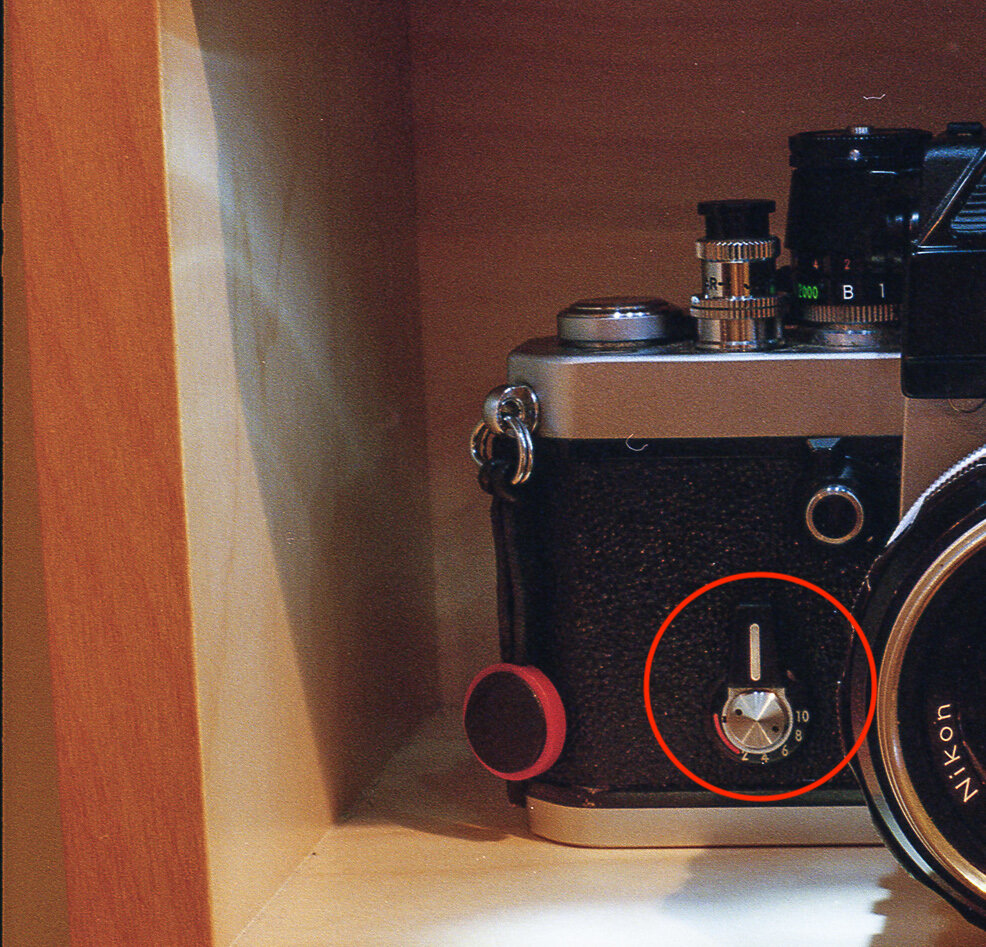
FIGURE 4: The exposure compensation dial currently set to “1x” as indicated by the orange selector dot above. Remember to have it set to 1X if you want to change the ISO! Otherwise the dial will not turn.
The film advance lever operates smoothly with a nice tactile gear shifting sound as it moves from the 25 degrees pre-advance all the way out to 130 degrees (see FIGURE 5). The film advance lever has a strong returning throw mechanism, springing back to the original position after advancing a frame - it’s very satisfying!
In comparison to other 35mm film cameras, the Pentax K2 feels like it has the “shortest” film advance throw which makes advancing to the next frame feel very fast. In the official Pentax K2 instructional manual, it’s labeled the “rapid lever” so this explains the short throw. I definitely don’t think it moves as smooth as my Nikon F2 film advance lever, but the advance lever on the Pentax K2 doesn’t feel “cheap”. I want to love my Nikon FE2, but I feel like I am going to break the advance lever on that camera. I believe the operation of the camera’s film advance lever is one of the most important functions because you’re going to be using it a lot and it needs to feel good every time - the Pentax K2 shines in this category.

FIGURE 5: From left to right: neutral, pre-advance and advanced positions.

FIGURE 6: The camera set to “Automatic” mode on the shutter speed dial - the blue needle hovers over Auto inside the viewfinder. The black needle is pointing at the shutter speed the camera will fire at.
The viewfinder on the Pentax K2 is nice and bright, covering 95% of the final composition; although not quite as large as the mighty viewfinder of the compact Pentax ME and MX. The 0.88x magnification viewfinder also comes equipped with either the “cross-microprism” or the “split-image” focusing screens. I prefer the split-image focusing screen because I find it more precise than “eyeballing” if the image is in focus. The large viewfinder coverage and magnification makes up for this so it’s not a huge deal for me.
The Pentax K2 light meter uses a simple “match needle” system which is the cleanest and easiest to use system compared to my other cameras. It’s a tie with my Nikon FE2 because the layouts are almost identical - the Nikon FE2 exposure information is displayed on the left side of the viewfinder. Since the Pentax K2 is powered by Photo-Silicone Diodes (SPD) cells it makes light metering very fast and responsive. It is significantly faster than my other cameras that use the older Cadmium Sulphide (CdS) cells to read light like on my Minolta XE-7 and the DP-1 Pentaprism on my Nikon F2.
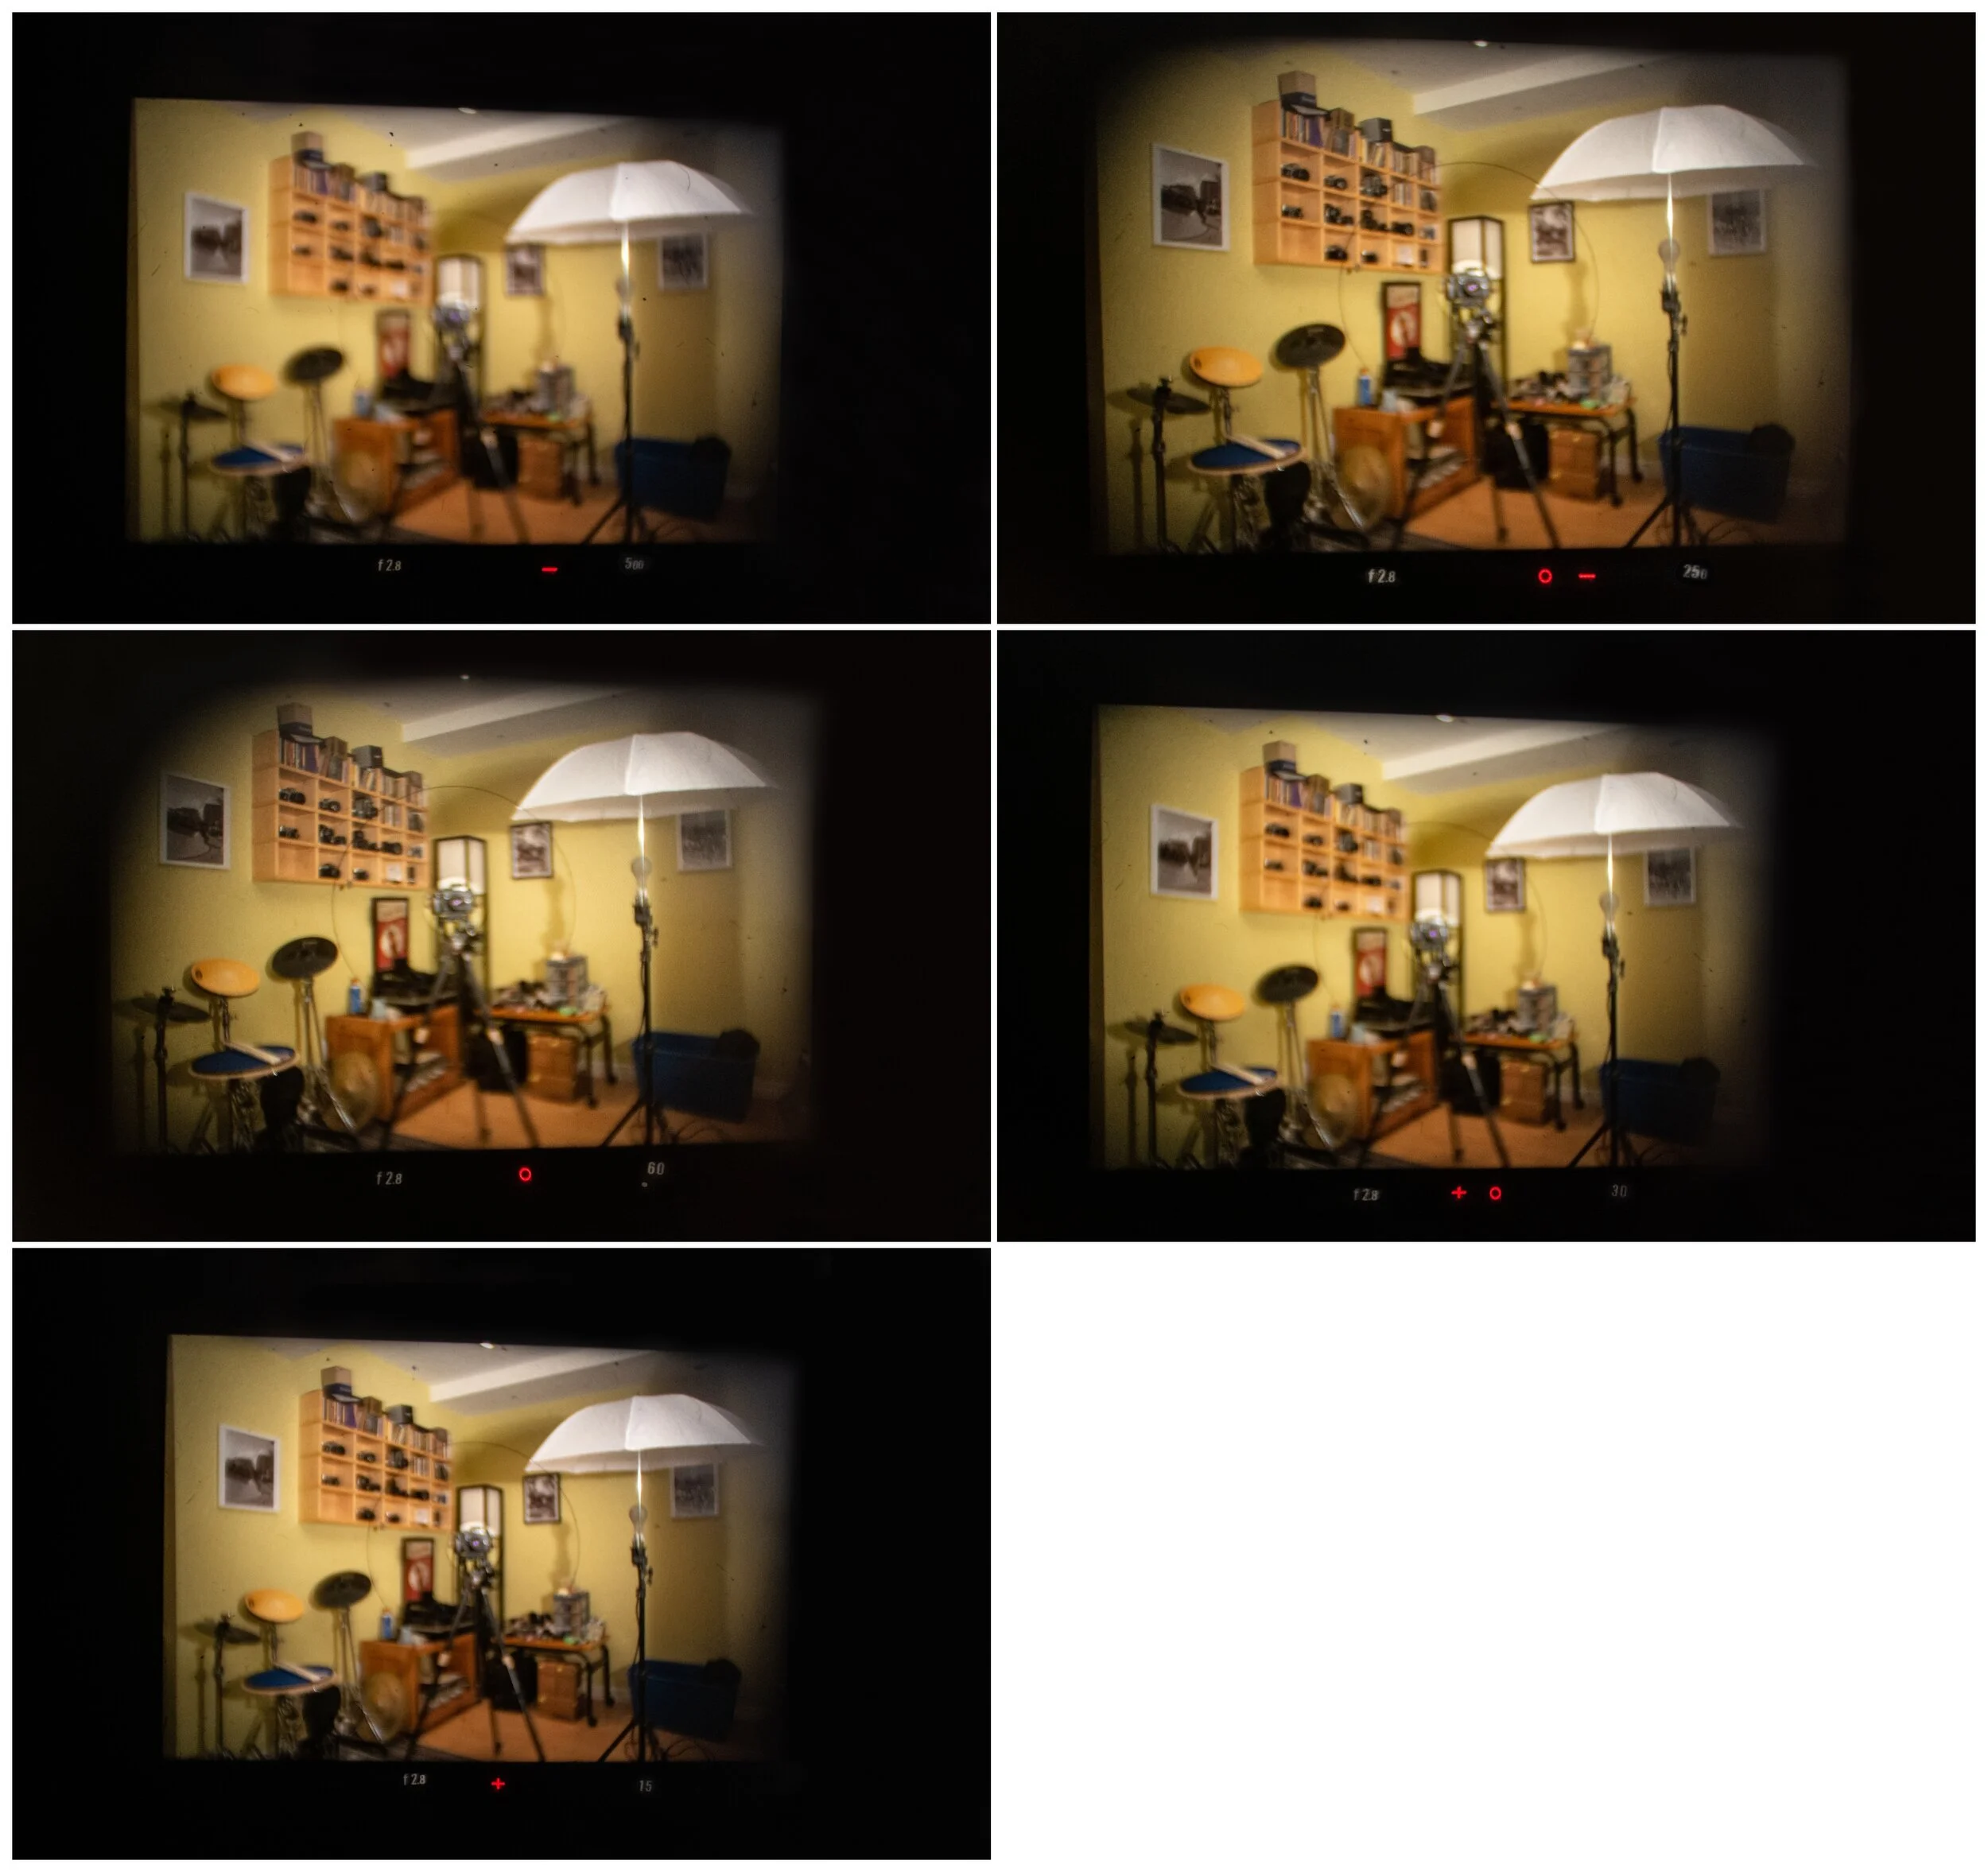
The needle distinction between the selected shutter speed and recommended shutter speed is very user friendly; the wide blue needle indicates the current shutter speed on the camera and the skinny black needle indicates the recommended shutter speed which moves up or down depending on the direction you turn the aperture ring or point the lens. The correct exposure is achieved when the two needles align (see FIGURE 7). It’s also easy to know if you’re slightly over or under exposing, so doing this “intentionally” is very easy.

FIGURE 7: Pentax K2 viewfinder in “manual mode”. The black and blue needles align indicating proper average exposure for the middle of frame.
I find the viewfinder layout of the Pentax K2 cleaner and more intuitive than the Minolta XE-7’s metering system. On the Minolta XE-7 the set shutter speed and selected shutter speed are spread across the viewfinder, so it takes me a moment adjust (see FIGURE 8). On the Pentax K2, I can read the exposure much faster. Unfortunately the aperture readout in the Pentax K2 is not visible in the viewfinder and is only available on the Pentax KX and K2dmd. I wish knew that detail before I picked up the Pentax K2. I often have to take my eyes off the viewfinder and look at the lens to see what aperture I am set to. With that said, “less can be more” because there are some camera metering systems that are too cluttered and can pull you away from the composition of your shot. If you’re good at “ball parking” your exposure settings, prior to looking at the meter for fine adjustments, this is really not an issue but it’s something I often wonder why the feature was removed. Overall, the Pentax K2 is an excellent “everyday” camera that doesn’t need to do more than give you simple manual exposure guidance.
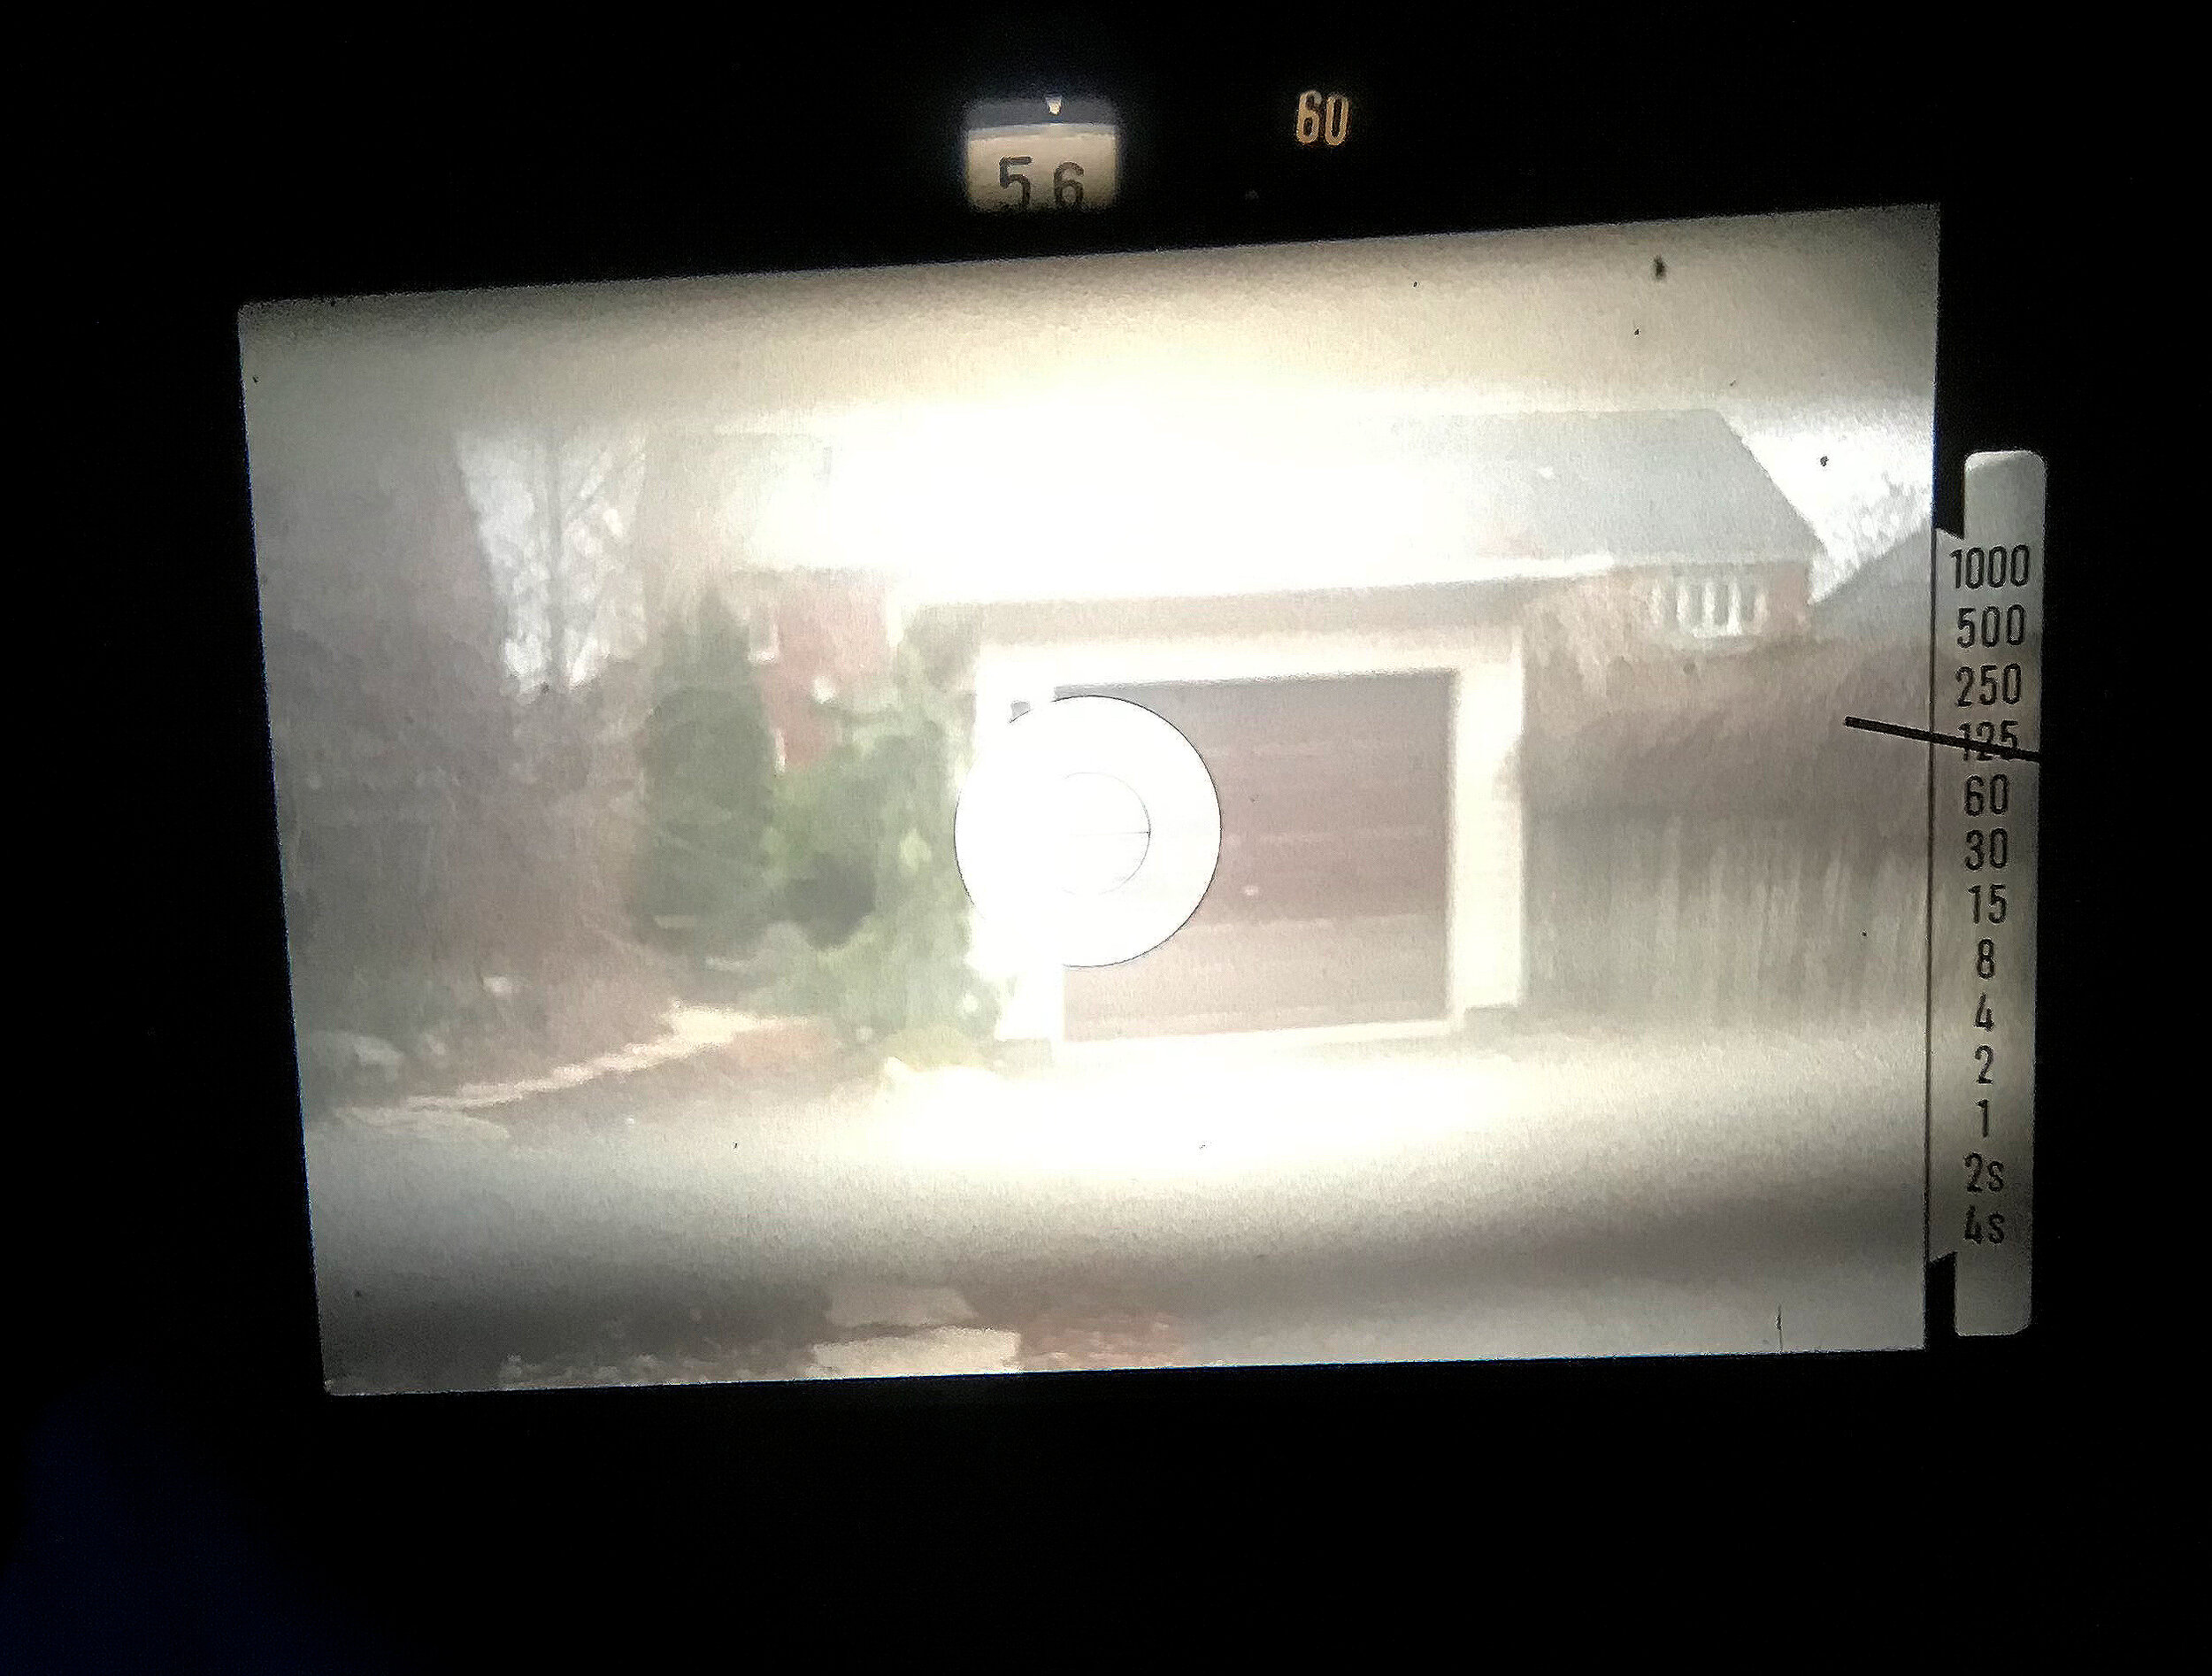
FIGURE 8: Minolta XE-7 viewfinder. The black needle at the side points at the “recommended” shutter speed, while the “set” shutter speed is positioned at the top next to selected aperture. Although it’s a super clear display, I would prefer a secondary needle in this system like the Pentax K2.
BUILD QUALITY/ERGONOMICS:
Like all 1970s era 35mm film cameras, the foundation of the Pentax K2 body is mostly made up of metal. The only parts that are plastic are the grip coverings for the film advance lever, self-timer lever, depth of field preview button and the mirror lock up switch. The mirror lock up switch is actually the only part that’s completely made of plastic.

For the interiors, it’s standard for a 35mm film camera but the vertically traveling metal focal-plane shutter curtains are beautiful to look at and really highlights Pentax engineering of the time period. The shutter also sounds just as good as it looks with its authoritative clap with every shutter speed sounding distinct. Compared to the Pentax KM and KX’s maximum 1/60th shutter flash sync using horizontally traveling cloth curtains, the upgraded vertically travelling metal shutter curtains on the Pentax K2, allows for 1/250th shutter flash sync.

For the camera’s medium size, it’s not as heavy as it looks weighing in at about 680s grams without a lens. That’s about 200 grams lighter than my Nikon F2SB without a lens. Even adding a standard short prime lens on the Pentax K2 still makes it less than a pound. With a comfortable strap it makes for a great, tough everyday camera you can easily stow away in your camera bag. The thick horizontal width of the Pentax K2 body has a nice solid texturized bubbly grip that feels very secure in the hands. The corners of the body are rounded off just enough for your fingers to comfortably wrap around. Some cameras use texturized leather wrapping which can feel slippery when your hands begin to sweat. These styles of body wrappings also fade, chip or even completely peel off the body over time which would require re-wrapping. With the Pentax K2, you can feel the solid texture quality and you know it’s not going anywhere.
DESIGN:

The DNA of the Spotmatic is very much present on the Pentax K2 and if you are familiar with using any Spotmatic camera, you will feel right at home with the K2. The design of the Pentax K2 fits even closer to the Spotmatic ESII. Although it wasn’t designed to compete with the Olympus OM-1 in terms of size, it did refine the classic design and shape of a 1960s style SLR camera with a slightly shorter vertical profile and smoother corners. The Pentax KX and KM resemble the older Spotmatic design which appear slightly taller then the K2 and K2dmd.

FIGURE 9: Top view of the camera’s shutter speed dial.

FIGURE 10: Another view of the shutter speed dial in colour.
On the top view of the Pentax K2, the shutter speed dial have these convenient ridges for finger grip and compliments how well each shutter speed stop clicks as you turn the dial (see FIGURE 9). There’s also a nice colour distinction in green for the “automatic” mode apart from the manual shutter speeds. B (bulb mode) and 1/125th shutter speeds are both marked in orange as the “mechanical” speeds (see FIGURE 10). These mechanical shutter speeds will function if the camera batteries die. These coloured shutter speed settings make for quick and easy navigation between modes.

FIGURE 11: View of the lock switch for the shutter release button.
The shutter release button has a convenient locking switch that’s ridged just like the shutter speed dial to prevent camera misfires from fidgety hands (see FIGURE 11). Some of the later Pentax models such as the Pentax Super A and Program Plus began to “over engineer” such a simple function that it becomes a bit difficult to lock the shutter button.

FIGURE 12: Placement of the self timer lever and depth of field preview button. Self timer handle partially painted in white.
The self timer lever and depth of field preview button are a little too close together, though the depth of field preview button protrudes out just enough so that the self timer lever doesn’t get in the way (see FIGURE 12). The depth of field preview button is also nicely rounded off and feels comfortable to press down. I have relatively small hands and I don’t feel a strain when reaching for the depth of field button while looking through the viewfinder.
The ISO dial is located around the collar of the lens mount which is unique but very strange design and engineer choice. The KM, KX and K1000 kept the ISO dial placed around the film rewind lever which is typically where it’s found on most film cameras. The ISO dial also controls when you want to use exposure compensation. There’s a tiny orange dot that indicates where you have the exposure dial set, but it’s hard to tell what setting you are on at a quick glance (see FIGURE 4). You have to tilt the camera at a certain angle to see the indicator better and this is especially difficult if you are in low light.
I’ve always wondered why Pentax decided to put the ISO/Exposure Compensation dial around the lens mount. I prefer the set up of the KX, KM and K1000. Perhaps the Pentax designers took influence from how Olympus and Nikkormat (Nikon) put their shutter speed dial around the lens collar. Since the ISO dial isn’t used frequently like the shutter speeds, it made sense to put it there to de-clutter controls from the top view of the camera. When I consider it in that way, the interface is quite nice and minimal on the K2. I hope the pro photographers at the time agreed to that design choice, but I am sure there were complaints.

FIGURE 13: View of the mirror lock up switch.
The self timer lever is standard with a bit of textured grip. The plastic part of the lever is partially painted in white while the rest of arm reveals the metal foundation (see FIGURE 12). This is to show the camera’s metal foundation, assuring customers that Pentax isn’t cutting corners with their parts.
The mirror lock up button is completely made of plastic though, but its movement has a nice resistance to it and clicks into place with authority. It has a texturized lever as well. I do wish the colour was the same as the self timer because it’s hard to see camouflaged up against the body (see FIGURE 13).
The placement of the flash bulb and electronic flash sync ports located next to the film rewind crank are also nice - the sync flash cords won’t get in the way from operating the camera (see FIGURE 14). If you’re lucky, most Pentax K2 cameras include plastic plugs from keeping the ports from getting dirty. They also plug in pretty sturdy so they won’t fall out on their own. Next to the sync ports is the battery check button and the LED light (see FIGURE 14). The battery check button is small and difficult to press but I believe this is by design. According to the manual, you don't want to over-use the battery check because it will drain the LR44 batteries faster.

FIGURE 14: View of the flash bulb and electronic flash ports located at the side of the camera. Battery test button and LED light indicator is placed in the back next to the viewfinder.
VERDICT:
Overall, the professional grade Pentax K2 is a highly recommended alternative to the popular beginner Pentax K1000. Not only does the K2 offer a lot more features, it’s also a little more compact and has better build quality. You can pick up a Pentax K2 for almost the same price as a mint condition Pentax K1000 - unless you are an avid camera collector, why pay more for less features? Even the Pentax KX and KM are better choices as they are completely mechanical and also have more features than the K1000.
Once again, the ISO dial is the biggest flaw, so if you’re not a fan of the ISO functionality then I cannot recommend this camera. If you don’t take care of your Pentax K2 properly and let it sit in dirty places all the time, dust and dirt can easily get caught between the body and dial which can make turning the ISO dial extra difficult. The ISO dial functionalities is definitely one of the first things you want to check with the seller, especially if you’re buying online.

FINAL THOUGHTS AND RECOMMENDATIONS:
The Pentax K-Series has an exciting wide range of systems to choose from depending on what you’re looking for. I know that it looks like I’ve been bashing the Pentax K1000 throughout this article, but I don’t think it’s a bad camera at all. My goal is to get readers and buyers to broaden their understanding of the K-series, so that you can make a more informed decision on what camera is best for you.
If I had to pick one camera from the K-Series it would have to be the Pentax KX. As much as I love the Pentax K2, the features on the Pentax KX are nicely wedged between the K2dmd all the way down to the K1000. All the shutter speeds are mechanical it only needs batteries for the light meter and it has the set aperture displayed inside the viewfinder. The only con to mechanical shutters are that they’re more likely to loose shutter speed accuracy due to probable wear and tear of the internal gears. Electronic shutters are known to stay accurate for much longer - obviously if the electronics die then it’s a dead camera that is much harder to fix than mechanical cameras. Even if the mechanical shutter speeds are off by a quarter/half stop, you’re still going to get a decently exposed image - I would still advise getting your camera cleaned, lubricated and re-calibrated if possible.
As for the K2dmd I don’t think it’s worth struggling to find a fully working body since there are so many other cameras on the market that are easier to find and offer the same features. If you’re an avid collector and money isn’t an issue, then the K2dmd is probably worth it for showcase display and a major bonus if it’s in mint working condition.
Unlike the K2dmd and K2, the KX, KM and K1000 are fully mechanical cameras and only needs batteries to power up the light-meter. The K2 and K2dmd rely on batteries to shoot on most shutter speeds. In my experience, LR44 batteries can last up to a year. Another disadvantage with battery operated cameras is that if you’re shooting in very cold weather, batteries can fail and the camera won’t fire at the selected shutter speed but thus far, I haven’t had this happen to me yet with the Pentax K2.
If you are truly set on a Pentax K1000 just for its simplicity and popularity, try to find older models made by the Asahi Corporation and not the exported versions. The Japanese versions have the Asahi embossed on the back of the camera, just behind the film advance lever. Though from my research, authentic Japanese made Pentax K1000s seem to outnumber the exported versions.
The Japanese made K1000s are known for better build quality and they’re durable like tanks, very reliable and easily serviceable. Though I am sure the exported versions are just as reliable, they don’t have the same build quality. “The less electronics the easier it is to repair" as most technicians say, so simplicity can win over people.
If you’re patient and can find a mint condition Pentax KX for the same or even better price as the Pentax K1000, definitely go with the Pentax KX. Just make sure you’re not a “left eye shooter” - the film advance lever needs to be in the “pre-advanced” position in order to turn on the light meter. You can push it back in once you’re ready to take the shot.
At the end of the day, a camera is just a tool and a skilled photographer can yield incredible results with anything. Pick the right camera that suits your needs best.
Thanks for reading and happy shooting!
PS….
If you’re still not sure which camera is right for you - I’ve created a breakdown comparison list below:
___________________________________________________________________________________
PENTAX K2DMD
Pros:
Aperture readout in the viewfinder
Motor drive couplings
Aperture Priority Mode
1/250th Flash Sync
Size is slightly trimmed down vs the KX, KM and K1000
Retractable viewfinder blindfold (only available on this model)
Mirror lock up switch
Depth of field preview button
Self-timer
Exposure compensation dial
Wider ISO range from 8-6400 (wider than the KM and K1000)
Meter switches off on its own after brief inactivity (unlike the KM)
Cons:
Relies on LR44 batteries to operate semi-electronic shutter
Only 1/125th and bulb mode are mechanical shutter speeds
More electronic parts - may be harder to repair and replace
Finicky ISO dial mounted around the lens mount collar
ISO dial is prone to catching dirt without proper care
Difficult to find in full working condition on eBay
Expensive on eBay (even when not fully working)
___________________________________________________________________________________
PENTAX K2
Pros:
Aperture Priority Mode
1/250th Flash Sync
Size is slightly trimmed down vs the KX, KM and K1000
Mirror lock up switch
Depth of field preview button
Self-timer
Exposure compensation dial
Wider ISO range from 8-6400 (wider than the KM and K1000)
Meter switches off on its own after brief inactivity (unlike the KM)
More readily available in working condition that the K2dmd
Cons:
NO aperture readout in the viewfinder
NO motor-drive couplings (only available on the K2dmd)
Relies on LR44 batteries to operate semi-electronic shutter
Only 1/125th and bulb mode are mechanical shutter speeds
More electronic parts - may be harder to repair and replace
Finicky ISO dial mounted around the lens mount collar
ISO dial is prone to catching dirt without proper care
___________________________________________________________________________________
PENTAX KX
Pros:
Doesn’t rely on batteries; mechanical shutter (at all speeds)
Batteries only power the light meter
Aperture readout in the viewfinder
Mirror lock up switch
Depth of field preview button
Wider ISO range from 8-6400
Fully mechanical body allows for simpler repairs
Meter switches off on its own after brief inactivity (unlike the KM)
Easier to repair, less electronics
Cons:
Film advance lever has to be slightly pulled out to use meter
Meter function with the lever is not good for left eye shooters
Slower 1/60th Flash Sync
No Aperture Priority Mode (full manual only)
NO motor-drive couplings (only available on the K2dmd)
___________________________________________________________________________________
PENTAX KM
Pros:
Doesn’t rely on batteries; mechanical shutter (at all speeds)
Batteries only power the light meter
Depth of field preview button
Self-timer
Cons:
Meter cannot be turned off (remove batteries/put lens cap on)
Narrow ISO range from 20-3200
NO aperture readout in the viewfinder
NO mirror lock up switch
Slower 1/60th Flash Sync
No Aperture Priority Mode (full manual only)
NO motor-drive couplings (only available on the K2dmd)
______________________________________________________________________________
PENTAX K1000
Pros:
Doesn’t rely on batteries; mechanical shutter (at all speeds)
Batteries only power the light meter
Much more readily available than any other Pentax on the market
Meter switches off on its own after brief inactivity (unlike the KM)
Easier to repair, less electronics
Cons:
Narrow ISO range from 20-3200
NO aperture readout in the viewfinder
NO mirror lock up
NO depth of field preview
Slower 1/60th Flash Sync
No Aperture Priority Mode (full manual only)
NO motor-drive couplings (only available on the K2dmd)