
The Nikon DP-3 Pentaprism Review and User Guide
Introduction

Nikon DP-3 - Front Side
The Nikon DP-3 is a compact precision pentaprism light meter attachment for the Nikon F2 body. Using Silicon Photo Diodes (SPD) for light readings, the DP-3 pentaprism is able to precisely calculate exposure values a lot faster than the earlier DP-1 and the slightly improved DP-2 predecessors which both used older Cadmium Sulphide (CdS) cells and resistors to read light.
The Nikon DP-3 also allowed “automatic shutter speed priority” control when coupled with Nikon DS-1 and DS-2 attachments. This was a feature carried over from the Nikon DP-2.
The Nikon DP-3’s major upgrade from CdS to SPD metering was a significant shift in camera light metering technology and paved a new foundation for what future film camera metering systems would be engineered around.
Brief History
In 1976, not only was Nikon upgrading their light metering system with the Nikon DP-3, they were also one year away in transitioning from Non-AI to AI (Auto Indexing) Nikkor lenses in 1977. These new AI lenses, would greatly improve the “metering coupling system”, essentially making it faster to mount different lenses and calibrate the aperture ring to the pentaprism. With the older Nikkor Non-AI lenses, it required the photographer to line up “rabbit ears” on the aperture ring to catch onto the pentaprism’s “coupling pin”; some photographers called this the “lens dance” (see FIGURE 1). I heard that veterans who used the old Non-AI system for years were so accustomed to this, that they would still turn the aperture right to left with the new AI system! If you’re not sure what the differences are between Non AI and AI lenses, have a look at FIGURES 3 and 4.

FIGURE 1: Mounting the lens on the F2 body. Marker indicates where the lens rabbits ears and coupling pin meet.
FIGURE 2: Bottom view of the Nikon DP-3 showing the “rabbit ear coupling pin”.
(See FIGURE 2) Since the Nikon DP-3 was still using the rabbit ear coupling pin, the shift to AI lenses would only allot 8 months of production time before the DP-3 was discontinued. So from 1977 to 1980, Nikon would then release the DP-11 and DP-12 which were both specifically made for the new Nikkor AI lenses. The DP-11 actually went back to DP-2 CdS metering; although it’s not clear why Nikon decided to downgrade, the DP-11 was made for photographers who preferred the “needle system” over the “LED” system and only carried AI lenses.
The DP-12 uses the LED system powered by SPDs just like the DP-3. The DP-11 and DP-12 would also be the last two models of Pentaprisms made for the Nikon F2 before quietly being discontinued and replaced by the Nikon F3 in 1980.
Despite the Nikon DP-3’s short production period, Nikon did include “rabbit ears” mounted on the newer AI lenses in consideration of the photographers who haven’t made the switch AI lenses. By the 1980s however, Nikon was phasing out the rabbit ears while still leaving the mounting holes on the lens body just in case the photographer still needed to put them back on themselves.
In my opinion, the Nikon DP-3 was Nikon’s gift to their customers because it bridged the lens compatibility gap while using the same SPD light meter technology found in Nikon’s final DP-12. I am sure it saved a lot of headache for photographers at the time, to not have to upgrade their lens kits right away and make the most out of the Nikon DP-3.

FIGURE 3: AI (Auto Index) Nikkor lens. F-stops printed on the outer lip of the lens mount (behind the rabbit ears)

FIGURE 4: Non AI Nikkor Lens. No F-stops printed on the outer lip of the lens mount (behind the rabit ears)
My Personal Experience

First roll using the DP-3. Getting the feel for the LED interface!
Shooting with the Nikon DP-3 is a joyous experience with practice. In direct comparison to my older Nikon DP-1, the DP-3 is a lot faster to turn on with the flick of the film advance lever and is even faster to react to light depending on where I am pointing the lens. NOTE: Both Pentaprisms are centred weighted. The DP-1 meters 50% of the available light within 12mm diameter (the circle in the middle of the viewfinder). The DP-3 meters 60% of the available light within 12mm diameter and displays 100% of the final frame, just like the DP-11 and DP-12.
It took me a bit of time to get used to the LED system on the DP-3 because the DP-1 uses the more traditional needle alignment system which I naturally find more assuring (see FIGURE 5). Some shooters prefer one interface over the other but overall the LED system is a lot easier to see in any lighting situation, day or night. When looking through the viewfinder, the Nikon DP-3 sports 5 LED combinations allowing the photographer to fine-tune the exposure which is more precise than the 3 LED combinations on the Nikon DP-2 (see FIGURE 6). Even with the 5 LED combinations, it’s still a bit tricky to tell how over or under exposed my images will be but I’ve only been in the 1/4 to 1/2 stop range. If I turn the aperture or shutter speed dial one stop and cannot get that perfect “o” exposure, then it usually means I am not too far off and in the end, it’s always safer to over expose film anyways.

FIGURE 5: Nikon DP-1 viewfinder interface: Correct exposure currently set (may be 1/4 stop under), but pretty close. The more centred the needle, the more spot on the exposure will be depending on what part of the frame you want properly exposed. To “purposely over or under expose”, you have to balance the needle to lean to the left or right.
FIGURE 6: Nikon DP-3 viewfinder interface - (from left to right): underexposed, slightly underexposed, correct exposure, slightly overexposed and over exposed.

FIGURE 7: Highlighting the Nikon DP-3’s unique features.
Other unique features that are only available on the DP-3 and DP-12 are the 3 extra shutter speeds found past the B (bulb) mode (see FIGURE 7). These are the extra shutter speed numbers marked in red. Pressing and holding down the silver button at the top of the pentaprism shutter speed dial will allow it to swivel past B and select the camera to meter for 2 seconds, 4 seconds and 8 seconds.
NOTE: this doesn’t tell the camera to shoot at these shutter speeds, it’s only telling the pentaprism meter to get exposures for these shutter speeds. If you want to shoot at these shutter speeds, there’s a feature on the Nikon F2 that’s a bit of a hidden function. The self timer dial at the front of the camera is actually an extension to the shutter speed dial on the pentaprism and is used to tell the camera to open the shutter from 2-10 seconds; for this feature to work, the shutter speed must be set to B (bulb) mode (see FIGURE 8). Once you have selected your long exposure shutter speed, you can then meter with extended shutter speeds on the pentaprisms dial. Once you’re ready, press the silver button to take the picture in self-timer mode (it’s hidden behind the self time lever on FIGURE 8). The whole process requires careful finger dexterity, but I got used to it with practice and it’s useful if I don’t have an external light meter to use.
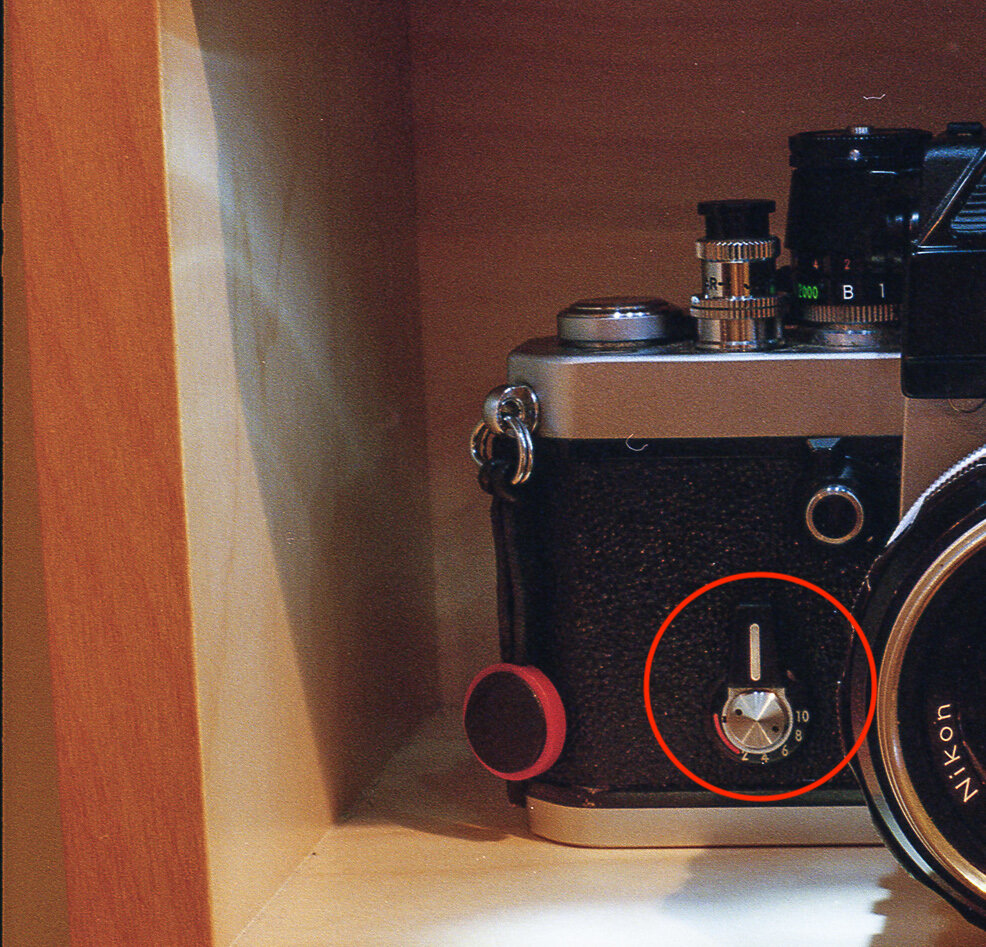
FIGURE 8: View of the Nikon F2 self-timer which doubles as an extension to the shutter speed dial for 2-10 second exposures. Set your shutter speed dial to bulb - turn the shutter release button to the left into “T” (Timed Exposure Mode) - turn the self timer arm to the desired length you want the shutter to remain open - press the shutter release button to take the picture. The mirror and shutter curtain will remain open for the duration you had selected.

FIGURE 9: Top side view of the DP-3. Hold the textured sliding switch back to light up the viewfinder in the dark.
The Nikon DP-3 also has a convenient illumination switch on the top that allows the photographer to read the aperture and shutter speeds in the dark (see FIGURE 9). This is extremely handy when there is no natural light available to illuminate through the pentaprism’s natural illuminate window. Obviously the DP-3 is pretty damn old now and Nikon at the time, was using incandesce technology to light up the exposure information and can potentially burn out from wear and tear age, so I try to use this feature sparingly when I can. On my copy of the DP-3, if I hold the light switch back for too long, the lights inside the pentaprism begin to flicker a little bit and I worry that I might wear it out but so far it’s been a pretty sturdy feature.

FIGURE 10: Top side of the DP-3. Correct exposure is currently achieved with the LED light glowing red at the top of the pentaprism. Remember to flip the switch to close the eyepiece curtain.
If you plan on shooting from the hip, the Nikon DP-3 also allows you to meter without looking through the viewfinder. Closing the eyepiece curtain will prompt the LED light at the top of pentaprism to light up red when the correct exposure is achieved which is handy if you are shooting in a low light situation from the hip (see FIGURE 10). This is where the DP-3 lacks where the DP-1 and DP-2 shine; the DP-3 has a single light that only shows you have the correct exposure, but doesn’t indicate exactly how over or under exposed your shot will be. This functionality may be tricky to use for less experienced photographers who can’t quite estimate the exposure settings. If you require more exposure information, go with the either the DP-1 or DP-2 because it will tell you how under or over exposed you are with the tilting needle (see FIGURE 11).
NOTE: the top display on the DP-1 does not illuminate in the dark but the DP-2 does with external LED “plus and minus symbols”. If both symbols appear together, that’s the correct exposure on the DP-2.

FIGURE 11: Top view of the original Nikon DP-1 Pentaprism. The exposure is about 1/4 quarter under exposed (slightly leaning to the right). If the needle leans to the left, then you are increasingly over exposing the image. If the needle is anywhere within the dome, your image will be usable. NOTE: The DP-1 doesn’t have a viewfinder curtain switch, so this needle will always be active.
NOTE: Removing the Pentaprism off the Nikon F2 body is not an easy task. It’s the worst drawback the F2 has compared to my experience swapping pentaprisms with the Nikon F4 or Canon New-F1. Extra caution is required if you need to swap pentaprisms on the Nikon F2.

FIGURE 12: DP-3 Pentaprism “release lever”
To remove the pentaprism, press and hold down the front lever near the face plate so that the front claws of the pentaprism “unlatch” from the grooves on the Nikon F2 body. Press and hold down the release button on the back of the camera left of the viewfinder to unhinge the back of the pentaprism from the Nikon F2 body (see FIGURE 12 and 13). The two step process is tricky because it requires the lever and button to be pressed simultaneously while lifting the pentaprism up to dismount. It is so important to be gentle when removing the pentaprism; you can damage the connectors if too much forced is applied.

FIGURE 13: Backside of F2 body. Press and hold the button down to release the backend of the pentaprism.
Mounting the pentaprism back on isn’t that difficult, but you still have to carefully re-align the shutter speed dial to B (bulb) mode first so that the pentaprism shutter speed dial grooves line up with the shutter speed dial groove on the Nikon F2 body. You will hear a click once the grooves connect. Make sure to look through the viewfinder to see if the shutter speed information matches what you see on the shutter speed dial. That’s how you know the shutter speed dials are in sync.
Despite how difficult is to swap pentaprisms on the Nikon F2, it’s not a total blocker for me. Swapping pentaprisms is not something photographers have to do frequently anyways. I recommend getting two bodies with two different pentaprisms if your project requires it, otherwise, just get used to using one pentaprism!
Build Quality
The Nikon DP-3 was built in the decade when camera equipment was still made mostly of metal and hand assembled by certified quality control technicians. Just like any other film body camera and accessory made in the 1970s, picking up a DP-3 pentaprism will immediately remind you of this pure metal era. The Nikon DP-3 does not feel cheap and will not disappoint material-wise.

FIGURE 14: The weak points of the Nikon DP-3.
While the body foundation of the DP-3 is constructed mostly of metal and glass, the buttons and the outer layer trimmings are plastic. Compared to the increasing amount of plastic that was used in the 1980s to cut down on production cost, the plastic on the DP-3 has more practicality and feeling around the DP-3 doesn’t give you the impression the Nikon engineers were cutting any corners.
The Nikon DP-3 isn’t that heavy on its’ own but when attached to the Nikon F2 body loaded with batteries and a roll of film, the camera rig already weighs 834.5 grams (1 pound) and that is without a lens! Imagine adding Nikon MD-3 motor drive and a 70-200mm lens for high action photography! The Nikon F2 is a heavy camera system and it may be too heavy for those who prefer a much lighter and smaller system, but for the style of photography that I do, the weight isn’t too much of an issue.
Switching back and forth between my Nikon F2SB to my other go-to everyday SLR camera, the Pentax Program Plus - the Pentax feels like a toy in comparison even though it’s 5 times lighter and smaller. That’s another great camera system I will talk about in a later article.
The build quality of the Nikon DP-3 isn’t perfect though and the weakest parts on the pentaprism would definitely have to be the prism release lever switch at the front and the light meter switch at the top (see FIGURE 14). I get this terrible feeling that if you accidentally drop the camera head first on the pavement with the DP-3 attached, the release lever and light switch would be the first to go and since the outer layer is mostly plastic, dents and scratches are definitely prone to happen a lot easier than the body itself. If you drop the DP-3 without the body, the glass for the mirrors inside the pentaprism would definitely go first! I cringe thinking of all the damage possibilities!
1970s Camera Design

1970s camera designs remind me of old American muscle cars of the era. Everything built in that decade seemed to be purposely oversized for easy durability and sturdy handling. Though the DP-3 is just a separate accessory to the Nikon F2 system, the overall presentation of the DP-3 still has the 1970s design DNA. Bigger cameras will always have a special place in my collection when I want to feel like an old fashioned 70s newspaper/magazine journalist. I completely understand how some people think it’s ridiculous to use cameras that big and heavy these days especially now that we options to use smaller gear. I just feel safer with a bigger and sturdier camera in my hands because I know these 1970s era mechanical bodies will likely continue to work after I am gone and I love that feeling. It’s really an acquired taste at the end of the day!

The Nikon F2SB and a “re-wrapped” Minolta XD standing together. It’s clear the Nikon F2 is much taller with the DP-3 pentaprism and “optional” AR-1 soft shutter release button attached. You can easily shave off a couple of inches with the “meter-less” Nikon DE pentaprism attached and shoot without the AR-1 soft shutter - it’s a very customizable system!
Comparing the DP-3 to the pentaprisms of other camera systems from the early 1970s, the DP-3 is larger than most prisms but not as big as Minolta’s XK pentaprism which was monstrous in comparison. When I compare my Nikon F2SB to my Minolta XD for example, the size differences are already staggering so you can imagine how much bigger the Minolta XK looks! It’s a beautiful camera as well.
It’s important to keep in mind the Minolta XD and other compact Nikon cameras like my FE2 were released several years later (1977-1983) after the Nikon F2SB and Minolta XK; by that time Nikon and Minolta had already started re-designing their cameras to be a lot more compact by 1977.

Nikon, along with several other camera makers realized they had to play catch up with Olympus OM series who were several years ahead in that lane of the race. This trend in compact designs would continue well into the 1980s, until “some” design choices got weird and big again by the mid-late 1980s during the “autofocus era". SIDE NOTE: The beautiful Nikon F4 of 1988 is my favourite AF camera. Perhaps I’ll write another article about that camera later on!
Design and Ergonomics

The first cosmetic details that I noticed when I saw my Nikon F2 were the rigid and smooth lines of the body, along with its no nonsense placement of levers and buttons. The tapered off corner and edges of the texturized body allow for easy gripping. The Nikon F2 body has no useless design gimmicks, no crazy amounts of flaps and doors to reveal even more buttons; just the right amount of accessible camera functions for the photographer to focus on creativity.
On the face plate of the DP-3, the old school Nikon logo pops nicely on the glossy black finish and the engraving of the letters are sharp. The white paint coating for the Nikon letters also seem to last forever, as long the faceplate isn’t handled in a way that can cause the lettering to chip or fade over time.

FIGURE 15: Eyepiece end of the Nikon DP-3
The eye piece, the prism release lever switch and the top side of the DP-3 where the external light meter is located, all have these distinct textures to match the texture design of the Nikon F2 body (see FIGURE 15). Not only is this a subtle complimentary design, but the textures also add a bit of finger grip too which is handy when you’re removing or attaching the DP-3 to the Nikon F2 body. There’s even a bit of texturized gripping on the switch to open and close the viewfinder curtains when doing long exposure shooting.

FIGURE 16: DP-3 ASA dial crowned over the shutter speeds selections below. The red arrow is pointing at 400 ASA (ISO).
On my DP-3, the shutter speed dial is in immaculate condition. The ASA (ISO) dial information at the very top and the shutter speeds are clearly marked without any fading or smudges. I also really appreciate the bright red arrow point at what ASA film speed your DP-3 is set to because on some cameras bodies, it’s a bit harder to see (see FIGURE 16).
The bottom of the pentaprism is where all the most delicate parts are located, so I wouldn’t spend too much time poking around. The first thing you’ll notice is the serial number indicating the type of Pentaprism you have.

FIGURE 17: Bottom side of the Nikon DP-3 Pentaprism.
When shopping for pentaprisms, it’s super important to check to make sure you’re getting the model you need by looking at the label just above the serial number (see FIGURE 17). Sometimes it’s easy to mix up the models of the Pentaprisms just by design.
The glass window that protects the pentaprism’s internal mirror takes the centre stage at the bottom of the pentaprism which is securely screwed down and protected by a metallic housing, coated in rubbery grip-like material. It’s meticulously designed and I often forget I am looking at 1970s technology. The bottom of the pentaprism has a clean layout with minimal screws inlayed around the perimeters to keep maintenance simple for camera repair technicians.

Final Design Thoughts
The design of the Nikon DP-3 was never meant to look discreet, but compared to the first Photomic meter head ever made for the original Nikon F body in 1962, the DP-3 came a long way down in size. The size comparisons can also be said for the other light meter pentaprisms released for the Nikon F2 system, but no matter which light meter pentaprism you choose, they are all rugged and built to professional quality standards.
Verdict
With all the praise I gave about the Nikon DP-3, it’s not exactly cheap and readily available on eBay or anywhere else online since it wasn’t in production for that long. Assuming that you already own a Nikon F2 body, deciding to get the Nikon DP-3 depends on a few things:
If you’re only carrying Non-Ai lenses and just want to upgrade from CdS cells to SPD metering then the DP-3 is a great choice. Find a DP-3 and you won’t have to upgrade your lenses to fit the DP-11 or DP-12.
If you’re only carrying AI lenses - Easy, go for the DP-11 or DP-12 since they’re more readily available. Reminder: the DP-11 uses CdS metering cells, but if you like match needle style metering then a DP-11 is a good choice. If you want to save money, the DP-1 prism is much cheaper than the DP-11. Make sure all your AI lenses have rabbit ears.
If you’re starting from scratch without anything, then pay attention to the names when you’re shopping. The Nikon F2 body name changes depends on what pentaprism is attached:
Nikon F2 (DE-1 prism which has no built in light meter, it’s just a viewfinder for composition)
Nikon F2 Photomic (DP-1 prism - match needle system)
Nikon F2S Photomic (DP-2 prism - 3 LED system)
Nikon F2SB (DP-3 prism - 5 LED system, just like the DP-12 but interchangeably compatible with Non AI and AI lenses)
Nikon F2A (DP-11 prism - Downgrade to CdS metering - match needle system and only compatible with AI lenses)
Nikon F2AS Photomic (DP-12 prism - the most expensive kit. As good as the DP-3 but only compatible with AI lenses).
Back in 2019, the average price for a Nikon DP-3 on eBay was between $300-$600 (Canadian dollars) so that’s like purchasing a whole camera kit (body/lens), yikes! If you don’t mind having a second F2 body, try to find a Nikon F2SB kit if the condition and price weight out better than buying the DP-3 alone. Nikon F2SB kits are even harder to find from my experience, but if you’re patient, you might score a great deal with a nice lens.
The DP-3 is a pretty niche item for the well informed Nikon shooter with specific interests and if find you can find one cheap, be wary of the condition of the internal parts; just because it looks good doesn’t mean it works because believe me, I’ve learned the hard way!
Personally, I absolutely love the Nikon DP-3. For a 47 year old camera accessory, it surprisingly holds up very well after 4 decades of service. I didn’t even start film photography until 2018 and to think that the DP-3 was already about 13 years old in 1986 (when I was born), really puts it perspective! It’s a timeless piece of technology that runs like an old clock continuing to define time in the modern age.
Good luck in your search and happy shooting!
